# Azure Active Directory
Synchronise users and groups from your Azure Active Directory (Azure AD). Azure AD is an identity management service provided by Microsoft used by Office 365.
It is cloud only, and stores user and group information. These can come from Office 365 or synchronised from a traditional domain. It is not an LDAP compatible directory store and uses a different API. It has reduced functionality so It cannot authenticate users. Authentication must come from another source like ADFS orWindows Integrated Authentication.
## Prerequisites
Before setting up your Azure Active Directory security sync within Workplace AI, you must first set up an Azure Registered Application and grant the required permissions.
### Setting up you Azure Registered Application
1. Navigate to [https://portal.azure.com](https://portal.azure.com/).
2. Check you're in the correct Azure Directory.
3. In the search bar, type “App Registrations” or select "App Registrations" under Azure Services.
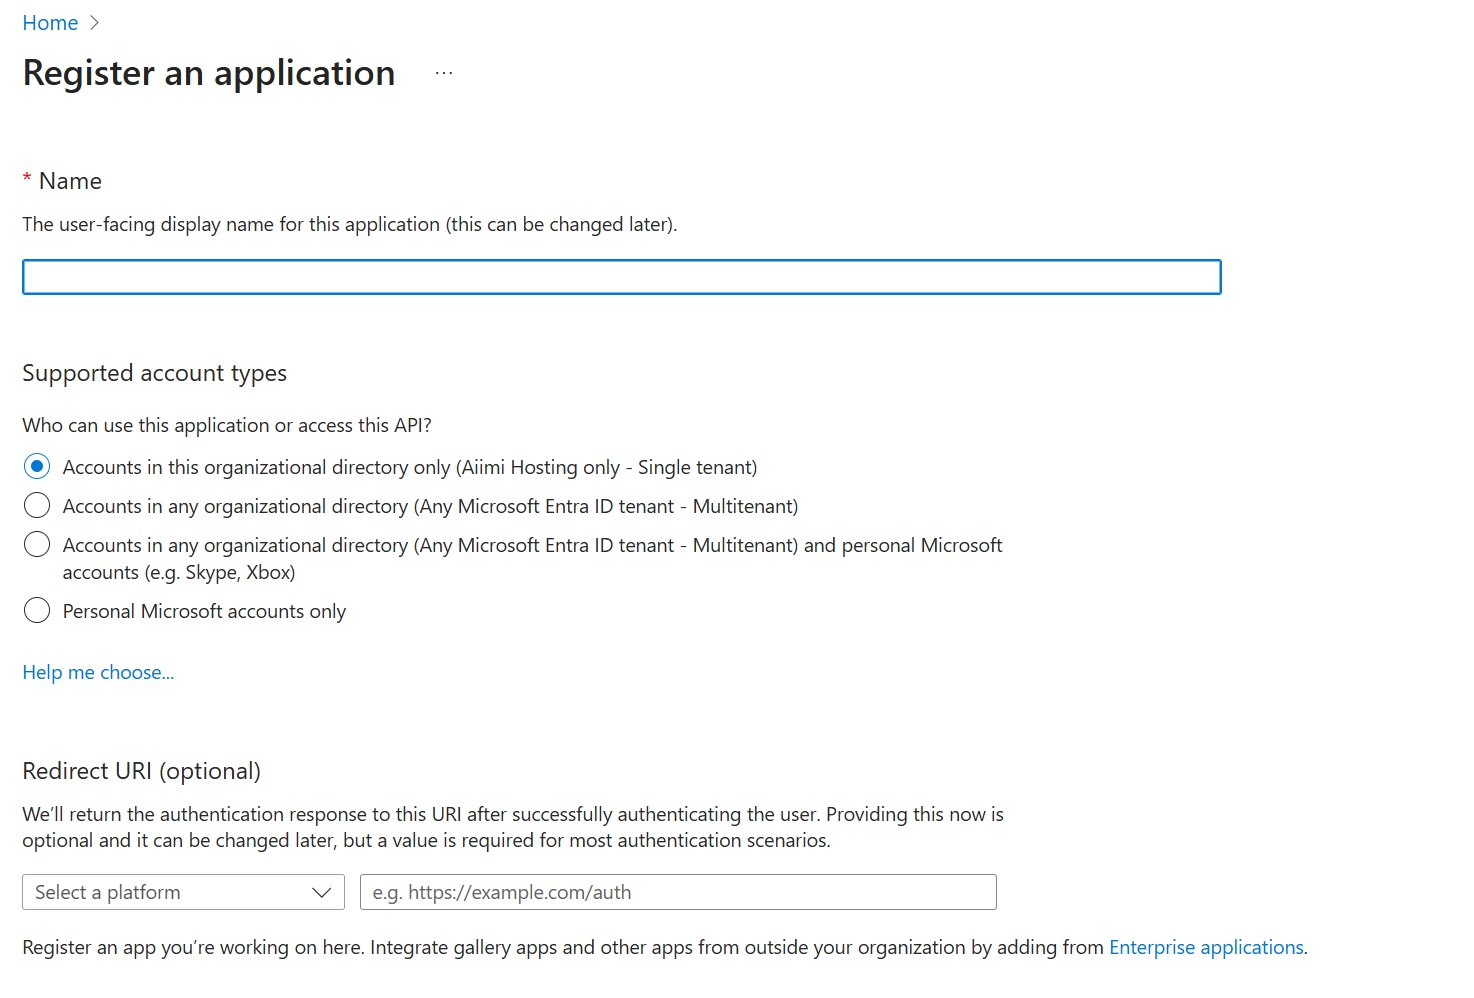
4. Select "New registration"
1. Name - Give the application a user friendly name.
2. Supported account types - Choose if the application will only be used in this directory. Or if it will be used in others too.
3. Redirect URI (optional) – This is not required.
5. Select "Register"
This gives you an overview of your application on the registered application page. You'll need the Application (client) ID and Directory (tenant) ID from this page later in the process.
### Creating your application secret
1. In Azure Portal, select "Certificates & Secrets".
2. Ensure you are on the Client Secrets tab.
3. Select "New Client Secret".
1. Description – Add a description to the secret of what it will be used for.
2. Expires – Give the secret an appropriate expiry date.
3. Select Add.
Be sure to save your secret to a secure vault such as LastPass as you will not be able to view it again. This secret is now associated with the registered application in Azure.
### Configuring your API permissions
Now you have a registered application with a secret, you can add API Permissions.
1. In Azure Portal, navigate to your registered application.
2. Under Manage, select API Permissions.
{% hint style="info" %}
There will always be Microsoft Graph, User.Read permissions. This is required and should remain in place.
{% endhint %}
3. Select Add a permission.
4. Under Microsoft APIs, select Graph API.
5. Select Application permissions.
{% hint style="info" %}
This ensures user credentials aren't required for authentication and the context is not scoped to one user.
{% endhint %}
6. From the available permissions, select
1. Directory.Real.All
2. Group.Read.All
3. User.Read.All
4. Member.Read.Hidden
7. Select Add permissions.
The permissions have been applied but not yet granted to the registered application. You must grant admin consent for any permission applied. This allows silent authentication for APIs. Without this the application needs a user invoked authentication flow.
8. Select Grant admin consent for .
9. Select Yes to confirm this selection.
The permissions have now been applied to the registered application for the Graph API.
## Setting up your Azure AD Security Sync
Within the security configuration modal in Control Hub
1. **Security System:** Select Active Directory from the dropdown.
### General
1. **Authority URL:** Enter the URI for your directory.
* Often this is followed by the tenant name. This may not be the case for some types of Office 365 e.g. Educational or Governmental.
2. **Credential:** Choose the relevant credential for this token from the dropdown.
3. **Scopes:** Enter the scopes requested to access a protected API. Example scope form, ResoucreUri/.default.
4. **Featured Domain Name:** Enter the old style NETBIOS domain name.
* This will be used when qualifying synced objects from an on-premise domain.
5. **Managed Domain Name:** Enter the Azure Domain Name.
* This will get qualifying objects created from Azure Active Directory.
***
### Groups Sync
This filter will be used when synchronising groups. Use the filter parameter syntax to retrieve a subset of a collection based on its properties. [Support for creating a Parameter Syntax](https://learn.microsoft.com/en-us/graph/filter-query-parameter?tabs=http) and [How to determine group sync properties](https://learn.microsoft.com/en-us/graph/api/resources/group?view=graph-rest-1.0#properties).
Only synchronise security enable groups is a predefined filter equal to (securityEnabled eq true). Enable this to synchronise only groups that can be used to secure access.
***
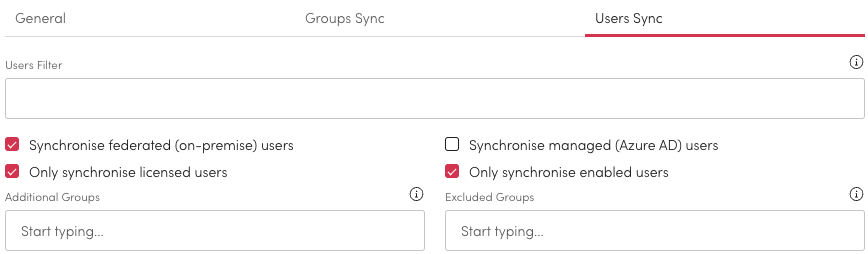
### Users Sync
The user sync area should be used to filter in and out users from synchronising and also adding group.
1. **Users Filters:** Create filters used when synchronising users to Workplace AI. Create the filters using Parameter Syntax.
2. **Synchronise Checkbox Setting:** Control what users synchronise by checking either:
* Synchronise federated (on-premise) users.
* Synchronise managed (Azure AD) users.
* All users will be synced, including some users that are neither federated or managed when neither are ticked.
3. **Only Synchronise Licensed Users:** Check this to filter out any expired accounts.
* This is a predefined filter equivalent to (accountEnabled eq true).
4. **Only Synchronise Enable Users:** Check this to filter out users without an Office 365 license.
5. **Additional Group:** You can add a user group to Additional Groups. This must include the appropriate qualifier.
6. **Excluded Groups:** Enter any groups from users that you want to remove. This must include the appropriate qualifier.